A laptop computer, usually called a notebook computer by manufacturers, is a battery- or AC-powered personal computer generally smaller than a briefcase that can easily be transported and conveniently used in temporary spaces such as on airplanes, in libraries, temporary offices, and at meetings. A laptop typically weighs less than 5 pounds and is 3 inches or less in thickness. Among the best-known makers of laptop computers are IBM, Apple, Compaq, Dell, and Toshiba. Laptop computers generally cost more than desktop computers with the same capabilities because they are more difficult to design and manufacture. A laptop can effectively be turned into a desktop computer with a docking station, a hardware frame that supplies connections for peripheral input/output devices such as a printer or larger monitor. The less capable port replicator allows you to connect a laptop to a number of peripherals through a single plug.
Laptops usually come with displays that use thin-screen technology. The thin film transistor or active matrix screen is brighter and views better at different angles than the STN or dual-scan screen. Laptops use several different approaches for integrating a mouse into the keyboard, including the touch pad, the trackball, and the pointing stick. A serial port also allows a regular mouse to be attached. The PC Card is insertable hardware for adding a modem or network interface card to a laptop. CD-ROM and digital versatile disc drives may be built-in or attachable.
Thursday, January 1, 2009
Saturday, December 27, 2008
Forex
The InstaForex Company provides a complete spectrum of services for currency trading on the international financial Forex market. The company’s main working directions are: providing qualified investment services aimed at earning speculative profit on international financial trading markets.InstaForex customers use leading online-trading technologies and gain access to news and information resources provided by leading information agencies. Today, thousands of customers—both new and professional money market traders— use InstaForex services .
The product, referred to as InstaTrader4, from the world’s leading trading platform software developer; News feeds from the leading information agencies, Reuters and Dow Jones; The possibility of obtaining help from major counter agents who have direct access to the money market.InstaForex trading terms are universal money resource management tools:
- Neither account size nor transaction volume is limited;
- More than 100 trading symbols exist;
- FOREX stocks and indexes;
- Transactions are executed immediately, within the second;
- Round-the-clock qualified technical and consulting support is available 24/5
Tuesday, December 23, 2008
Image 5
Creating an Album Page
If you have a lot of images, you probably want to categorize them into albums. And if you have a lot of albums, it’s best to give the viewer more information than a simple list of the albums’ titles. With the new page we’ll create in this section, your visitors should be able to gain a good idea of what each of your albums contains.
Some information that can be included on the album page includes:
Once again, the basic groundwork has already been done. Here’s the markup:
If you have a lot of images, you probably want to categorize them into albums. And if you have a lot of albums, it’s best to give the viewer more information than a simple list of the albums’ titles. With the new page we’ll create in this section, your visitors should be able to gain a good idea of what each of your albums contains.
Some information that can be included on the album page includes:
- a brief description of the album
- the number of photographs in that album
- a carefully selected thumbnail that represents the album
Once again, the basic groundwork has already been done. Here’s the markup:
Image 4
Creating a Thumbnails Page
We’ll create a typical thumbnails page—a display of small images, each of which links to its respective image page. Actually, since we’ve already created the look and feel of the image page, most of the groundwork is completed. The markup for our thumbnails page looks like this :

 You’ll notice that this markup is very similar to the image page’s markup, except the h1 is different, and the description area has been removed. We’ve created an unordered list to contain the thumbnails; it utilizes the class of thumbnails that we used previously on the navigation for the photo page.
The number of thumbnails displayed on this page can be varied to suit your preferences. I’ve chosen to display 25, as the layout is wide enough to accommodate five thumbnails per row and per column, which echoes the 1:1 proportions of the thumbnails themselves. A little aesthetically pleasing balance is never a bad thing!
The pagination-style navigation is very similar to the navigation on our single image page, but the class of thumbnails was removed, since these links don’t contain thumbnail images and don’t need to be styled as such. At the moment, our page appears as in Figure 1.
Figure 1. The thumbnails page before additional styling
Styling the Thumbnails
To produce the display shown in Figure 2.11, we now need to add the following styles for thumbnails:
 These styles are the same as those we used for navigation, except that we’re not positioning this unordered list. We also want to style the list items in exactly the same way as we did for the navigation list items. The results of this markup are shown in Figure 2.:

 These styles are the same as those we used for navigation, except that we’re not positioning this unordered list. We also want to style the list items in exactly the same way as we did for the navigation list items. The results of this markup are shown in Figure 2.:
Figure 2. Thumbnails page showing styled thumbnails
Finally, let’s style the navigation. As we’re not using a thumbnail image, we can use a slightly different style in this case:

The navigation styling differs from the thumbnails styles, in that a smaller padding value is applied to the bottom, and there is no border on the links. Make sure that this styling comes before the ul.thumbnails styles in your markup so that the borders and padding display correctly, as they do in Figure 3.
 Figure 3. Completed thumbnails page
Congratulations—you now have a thumbnails page and an image page. All we need to donow is make an album page.
Image 3
Adding Some Pagination Thumbnails
Now that the basic layout of the photo, title, and description has been created, we’ll add some navigational thumbnails that will appear to the right of the main image on each page. These images will provide a view of the previous and next images in our gallery. After the closing div for #content, add the following markup:
 Again, you’ll need to change the href attributes from # to link to their proper locations. On some of the pages we’ll be creating, the navigation won’t include images, but it does on this page. Let’s take advantage of the fact that we’re able to use two classes, and apply a navigation class to all instances of this pagination-style navigation. We’ll use the thumbnails class only for unordered lists that contain thumbnail images—we’ll meet thumbnails again when we create our thumbnail page.
Both the image and the text are wrapped in the same link, because we want the title of the image to appear underneath the image, but to share the same link, so that the hover effects will be the same for both elements. The linebreak (br ) is not required, but we add this so that the title will continue to appear beneath the image when the page is viewed unstyled.
As you can see in Figure 1, the linebreak adds an unsightly amount of space between the thumbnail and the title. We can take care of that problem simply by setting the br to display: none. The image is already set to display: block, so the title will display on its own line beneath the image, as intended.
 Figure 1. Page showing thumbnail navigation
 Next, we’ll make the thumbnails appear in a style that’s similar to the main image, bymaking them share some of the same styles. Then we’ll position the thumbnails to the right of the page:
 As you can see, these are very similar to the p.photo styles, but for a few minor differences:
 Now, we’ll style the thumbnail images. Since the thumbnails will look exactly like the main photo, we can just add these new, thumbnail-specific styles to the existing styles we have for p.photo a and p.photo a:hover, like so:
 Next, we need to add a width and a right margin, which will need to be created as a separate style rule, since p.photo won’t use it:
 The thumbnail images we used have 75x75px dimensions, so we’re using an 80px width value here. The result of our efforts is shown in Figure 2.
 Figure 2. Page showing styled thumbnail navigation
 Again, you’ll need to change the href attributes from # to link to their proper locations. On some of the pages we’ll be creating, the navigation won’t include images, but it does on this page. Let’s take advantage of the fact that we’re able to use two classes, and apply a navigation class to all instances of this pagination-style navigation. We’ll use the thumbnails class only for unordered lists that contain thumbnail images—we’ll meet thumbnails again when we create our thumbnail page.
Both the image and the text are wrapped in the same link, because we want the title of the image to appear underneath the image, but to share the same link, so that the hover effects will be the same for both elements. The linebreak (br ) is not required, but we add this so that the title will continue to appear beneath the image when the page is viewed unstyled.
As you can see in Figure 1, the linebreak adds an unsightly amount of space between the thumbnail and the title. We can take care of that problem simply by setting the br to display: none. The image is already set to display: block, so the title will display on its own line beneath the image, as intended.
 Figure 1. Page showing thumbnail navigation
 Next, we’ll make the thumbnails appear in a style that’s similar to the main image, bymaking them share some of the same styles. Then we’ll position the thumbnails to the right of the page:
 As you can see, these are very similar to the p.photo styles, but for a few minor differences:
- The padding needs to be set to 0.
- We don’t need to set a width.
- We turn the bullets off using list-style: none;.
- The navigation ul is positioned to the right of the main image.
 Now, we’ll style the thumbnail images. Since the thumbnails will look exactly like the main photo, we can just add these new, thumbnail-specific styles to the existing styles we have for p.photo a and p.photo a:hover, like so:
 Next, we need to add a width and a right margin, which will need to be created as a separate style rule, since p.photo won’t use it:
 The thumbnail images we used have 75x75px dimensions, so we’re using an 80px width value here. The result of our efforts is shown in Figure 2.
 Figure 2. Page showing styled thumbnail navigation
You now have a basic image page for your gallery. But how are visitors enticed to view this image page in the first place? By seeing the associated thumbnails page, of course!
Image 2
Styling the Images
Now, we’ll style the image and the link that contains that image. For this example, we’ll mimic a Polaroid-style photograph by using a white frame with a larger lower margin—a great place to add a date or copyright statement. Here’s the code:
 To do this, we’ll have an inset-style border around the image, and then an outset-style border around that, as shown in Figure 1.
 Figure 1. Example of an inset and an outset border
 To do this, we’ll have an inset-style border around the image, and then an outset-style border around that, as shown in Figure 1.
 Figure 1. Example of an inset and an outset border
The definition of separate colors for each side gives the border on the image the desired inset look. We could have used the inset border-style that CSS already provides, but the colors for the light and dark borders differ between browsers. To create the look we want, we use a 1px, solid border, and specify #ccc as its color.
We use a slightly lighter shade (#ddd) for the right border, and darker shades for the top (#bbb) and left (#eee) borders. The result fools the eye into seeing a threedimensional edge. The addition of a 5px margin to the lower edge distances the outside border from the image. It’s aesthetically pleasing to have a larger space on the bottom than around the sides, and it works well with the Polaroid-style look we’re trying to create.
The link that contains the image has a solid border of 1px, which uses the same colors as before, although they’re reversed to create an “outset” look (we’ve switched the top and bottom colors, and the left and right colors). We also add a padding of 4px. This padding, plus the 1px border we’ve added to the image and the 1px border we’ve applied to the link provides us with the 6px value that we’ve applied for the h1’s and paragraph’s margins, and helps the edge of the text line up with the image, instead of the outside border.
To ensure that the outside border that’s applied to the link containing the image snaps snug to that image, we float the paragraph and link to the left, and apply a 75% width to the paragraph. This width is a workaround that was developed for Internet Explorer to avoid the outside border filling the entire width of the page in that browser; the page still renders as expected in other browsers.
Next we’ll add some hover styles: a subtle, light gray background, and one color for the border for all four sides. The description paragraph is then set to clear: left, to clear the float from the above-image paragraph. The result is shown in Figure 2.
 Figure 2. Page showing the bordered image
Producing a Quick and Simple Layout
Now, we want to define the spacing and width of the div that contains all the elements of our page. We’ll also increase the font size for items within this div, to create the effect shown in Figure 3. By adding the code at this point, instead of at the body level, we ensure that relative padding and margin sizes are affected only within this div:

Because the images we’re using are no wider than 500px, and we want to have room for the border around each image, we’ll use a width of 512px for #content. You can vary this value to reflect the maximum width of your images. I recommend setting a maximum of 500px to ensure that the entire image will fit within most browser viewports. Just make sure that the width of #content is equal to the total width of the image plus any left or right padding and border properties.
 Figure 3. Page showing the styled div
We’re almost done!
Monday, December 22, 2008
Image 1
Image Galleries
Imagine that you have just walked into an art gallery. The pieces of art hang on well-lit expanses of white wall. There’s ample spacing between the works, so that each has its own presence without any distraction from those adjacent. The rooms are very spacious and it’s easy to find your way around the building. As you wander from room to room, you notice that within each of these rooms the works of art relate to each other. You know that, behind the scenes, a curator has put a lot of thought into the experience you have in this gallery while viewing the art.
Imagine that you have just walked into an art gallery. The pieces of art hang on well-lit expanses of white wall. There’s ample spacing between the works, so that each has its own presence without any distraction from those adjacent. The rooms are very spacious and it’s easy to find your way around the building. As you wander from room to room, you notice that within each of these rooms the works of art relate to each other. You know that, behind the scenes, a curator has put a lot of thought into the experience you have in this gallery while viewing the art.
A gallery web site should be conceptually similar to a real-life gallery such as this. You want to provide a clean, flexible space for your images to be displayed, with a corresponding sense of order and cohesion.
Creating an Image Page
The web page that displays your photograph, along with a title and possibly a description, is the equivalent of the expansive, blank walls in a real-life gallery. Let’s walk together through a basic example of how to create an image’s page. We’ll create the markup; add some style for the typography and colors of the images’ titles and descriptions; style frames, margins, and layout; and provide the placement of the navigational thumbnails.
Building a Basic Example
As always, our image’s page requires that we use well-structured markup:
This example is fairly basic:
 Adding Typography and Colors Let’s add some basic styles to our style sheet for the page’s typography and colors, which will produce the result shown in Figure behind :
The colors and typefaces you choose should work well with the style of imagery you’re using. White is a great color for galleries because it’s the most neutral color to work with, especially for a large variety of images, or for images that are changed frequently. On the downside, this means that you’ll see the use of white everywhere on gallery sites, so you may want to think outside the square if uniqueness is a priority. I’ve seen some photo gallery web sites that use black or gray for their pages, and they look wonderful, but do be careful about crazier colors. Remember that the page colors you choose can really affect the mood of your images, and that rules of clean design should still apply. It’s best to keep all design elements minimal: the visual focus of a gallery should be on the images.
I’ve chosen to use Times New Roman as it’s clean and sophisticated without being a distraction from the images. Although sans serif typefaces are easier to read on-screen, our gallery uses very little text so the use of serif fonts won’t be a problem.
Next, we style the h1, paragraphs (p) and unordered lists (ul) :
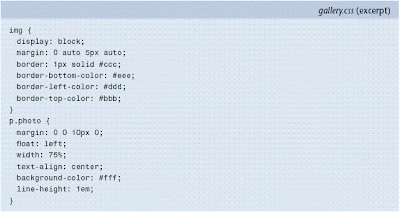
 To display galery.css show in figure 1. below :
 Figure 1. Page showing basic styles
Creating an Image Page
The web page that displays your photograph, along with a title and possibly a description, is the equivalent of the expansive, blank walls in a real-life gallery. Let’s walk together through a basic example of how to create an image’s page. We’ll create the markup; add some style for the typography and colors of the images’ titles and descriptions; style frames, margins, and layout; and provide the placement of the navigational thumbnails.
Building a Basic Example
As always, our image’s page requires that we use well-structured markup:
This example is fairly basic:
- The h1 is acting as a title and a breadcrumb, in an effort to keep things really simple.
- The set name and image name are emphasized.
- The image is wrapped in a paragraph—which will make it easier to position and style—and links to a full-sized version. A class of photo is given to this paragraph for styling purposes.
- The description is a paragraph with a class of description.
- The photo, header, and description is wrapped in a div with an id of content for styling. Each image is no wider than 500px.
 Adding Typography and Colors Let’s add some basic styles to our style sheet for the page’s typography and colors, which will produce the result shown in Figure behind :
The colors and typefaces you choose should work well with the style of imagery you’re using. White is a great color for galleries because it’s the most neutral color to work with, especially for a large variety of images, or for images that are changed frequently. On the downside, this means that you’ll see the use of white everywhere on gallery sites, so you may want to think outside the square if uniqueness is a priority. I’ve seen some photo gallery web sites that use black or gray for their pages, and they look wonderful, but do be careful about crazier colors. Remember that the page colors you choose can really affect the mood of your images, and that rules of clean design should still apply. It’s best to keep all design elements minimal: the visual focus of a gallery should be on the images.
I’ve chosen to use Times New Roman as it’s clean and sophisticated without being a distraction from the images. Although sans serif typefaces are easier to read on-screen, our gallery uses very little text so the use of serif fonts won’t be a problem.
Next, we style the h1, paragraphs (p) and unordered lists (ul) :
 To display galery.css show in figure 1. below :
 Figure 1. Page showing basic styles
Subscribe to:
Comments (Atom)
